Sandbox Testing for E-Invoicing: A Step-by-Step QA Checklist
Sandbox testing checklist for e-invoicing APIs. Validate invoice submission, status flows, errors, and production readiness before go-live.
.webp&w=3840&q=75)
Imagine a product team that has been integrating e‑invoicing for weeks. The UI is polished, API calls are “green”, and the finance team is lining up the first compliant batch. Then the final tests begin:
Nothing catastrophic has happened yet, but everyone can see what’s coming: rejected invoices in production, delayed payments, frantic debugging, and customers asking whether their invoices are even legal.
Tax authorities like ZATCA in Saudi Arabia and the FTA in the UAE now offer their own integration sandboxes and simulation portals precisely because failure in production is too expensive: a malformed XML field, missing digital signature or mis‑routed endpoint can stall revenue and trigger penalties across an entire market.
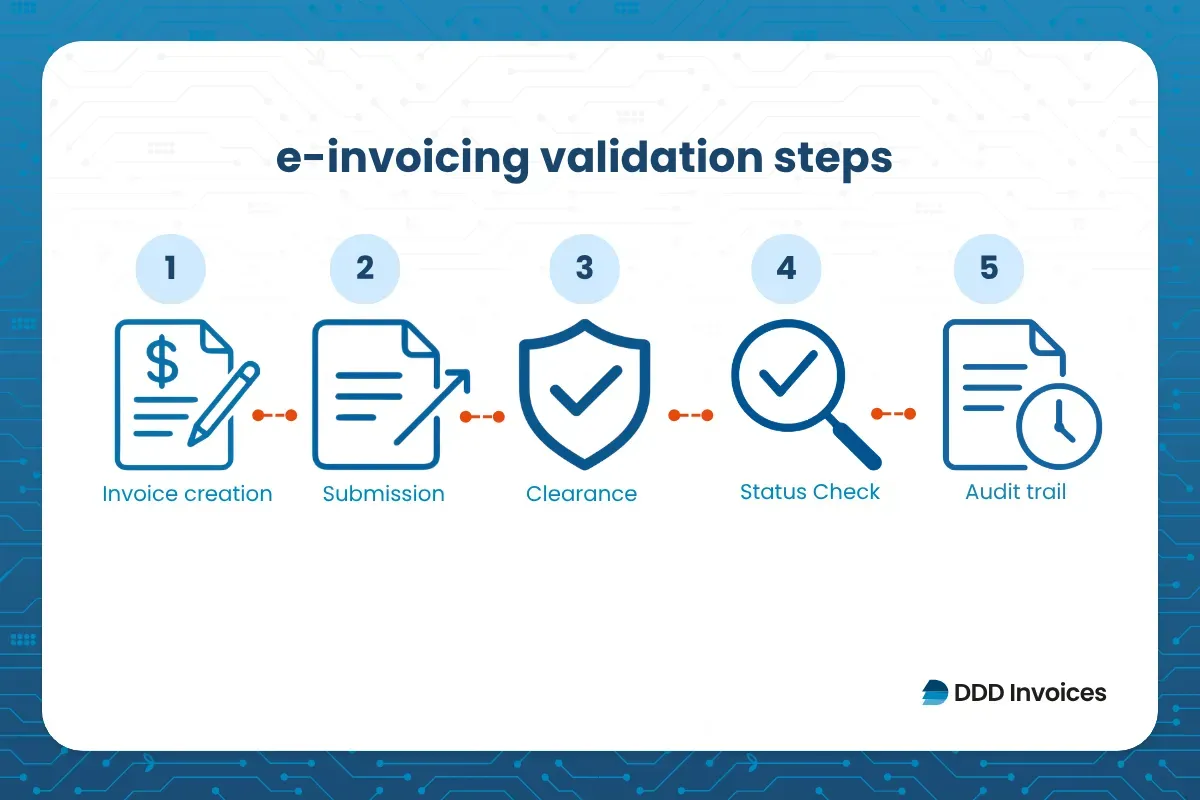
In reality, a meaningful e‑invoicing sandbox run looks very different. It walks the entire lifecycle of an invoice, end to end:
In Continuous Transaction Control (CTC) countries, every invoice is checked in real time or near‑real time by tax authorities or certified platforms, so sandboxes exist to safely mimic that behaviour with test portals, credentials, schemas, and realistic responses.
Treating sandbox testing as “send one invoice and look for 200 OK” is not enough: you must walk the full lifecycle by validating master data, formats, authentication, submission paths, status changes, and error handling, while capturing logs, signed XML, IDs, and QR data as audit evidence.
Treat the sandbox as a mirror of production, not a throwaway playground. Before sending a single invoice, define the business and technical context you want to validate.
Test company/companies with realistic legal names, VAT IDs, addresses, registrations, and tax regimes.
Countries and transaction types you actually support: B2B, B2G, B2C where relevant.
A catalogue of realistic invoice scenarios:
Test credentials registered with the relevant tax authority or provider sandbox (e.g. ZATCA, FTA) and clearly separated from production keys.
Stage API endpoints and base URLs from your e‑invoicing provider’s documentation, mapped into your API client (Postman, Insomnia) via environment variables.
Local or cloud XML/JSON validators wired into your workflow to catch schema errors before submission.
Webhook endpoints or polling jobs for status updates, with logging and correlation IDs.
A CI/CD pipeline stage dedicated to sandbox regression tests, so every release re‑runs critical scenarios automatically.
Your first QA checkpoint is simply: “Is our sandbox ready to behave like our business, not like a demo?”
Area | What to validate |
|---|---|
Authentication | API keys, tokens, roles, entity access, certificate validity |
Company setup | Legal entity, VAT ID, address, country, tax registration |
Invoice data | Buyer/seller details, taxes, totals, line items, references |
Channels | Tax portal, Peppol, national network, email, API delivery |
Status handling | Submitted, accepted, cleared, rejected, delivered, failed |
Evidence | Logs, timestamps, proofs, XML, QR, response payloads |
One critical rule sits above everything else: never use live credentials, real IDs, or production endpoints in sandbox tests; mixing environments risks data leaks, bad audit trails, and unintended real submissions.
Once the environment is ready, move into structured API test cases. Here you prove that your system can create, send, track, and recover invoices reliably across markets.
Start with a simple valid B2B invoice to confirm that:
Then, increase complexity one layer at a time. A practical set of API test cases includes:
Test case | Purpose |
|---|---|
Valid B2B invoice | Confirms core submission workflow |
Missing required field | Checks validation clarity and user feedback |
Invalid VAT/tax ID | Tests tax identity checks and rejection handling |
Duplicate invoice number | Prevents accidental double submission |
Network timeout/delay | Tests retries, backoff, and idempotency |
Status callback/webhook | Confirms system‑to‑system communication |
For each negative scenario, strong QA doesn’t stop at “the platform rejected it”.
They check:
Many teams only discover the real differences between sandbox and production on launch day, which is far too late. Your checklist should explicitly ask: “What changes when we flip the switch?”
Typically, you need to validate:
Question | Why it matters |
|---|---|
Are TEST and PROD credentials clearly separated? | Prevents accidental live submissions from dev/test |
Can test invoices be identified in logs and reports? | Avoids audit confusion and keeps test data out of finance reporting |
Are production prerequisites (certificates, approvals) complete? | Prevents blocked go‑live due to missing legal or technical steps |
Are status messages structurally identical in TEST and PROD? | Avoids last‑minute mapping changes after go‑live |
Is invoice numbering handled correctly for PROD? | Avoids duplicates and legal issues with number gaps |
Are failed submissions recoverable with clear retry and fix paths? | Protects finance operations and cash flow |
This is where the story shifts from “Does the API work?” to “Can the business safely rely on this every month in every country?”
A complete invoice integration test traces an invoice from creation in your product to its final, audit‑ready state ike parcel tracking that passes through tax portals, Peppol access points, national platforms, and your own archive.
Your workflow should look like this:
The best QA teams deliberately test failure here: schema changes, version mismatches, expired certificates, network flakiness, and authority‑side behaviour changes.
For software providers, ERPs, fintechs, and marketplaces, each new country adds its own formats, channels, errors, and sandboxes, making separate sandbox playbooks per jurisdiction unsustainable.
This is where a unified infrastructure provider like DDD Invoices can support your sandbox strategy naturally.
DDD Invoices offers:
Used this way, sandbox testing becomes a reusable QA and compliance system for new mandates, CTC models, and integrations without overloading your engineering team.
Still have questions?
In the 30min free call we will discuss:
Sandbox testing means validating invoice creation, tax logic, submission, statuses, and error handling in an isolated, non‑production environment before real invoices are sent.
Include failed submissions, invalid formats, wrong tax IDs, duplicates, network timeouts, clearance delays, schema changes, and authority‑specific rejections, not just happy‑path invoices.
Keep structured evidence packs (logs, XML samples, portal screenshots, API responses, test reports) under version control so you can show what was tested, when, and with which setup.
No, test keys, certificates, and endpoints must stay separate to avoid data leaks, accidental live submissions, and broken audit trails; switching to PROD should be a controlled step.
Written by the Compliance & Growth Team
Reviewed by Denis V. P.


DDD Invoices is an enterprise-grade platform delivering a powerful infrastructure for creating, sending, receiving and storing electronic documents. DDD Invoices enables software providers like ERPs, SaaS, eCommerce, POS systems, accounting & invoicing softwares, billing services and others, to easily adhere to global invoicing compliance requirements and shorten their time-to-market.

.webp&w=3840&q=75)
.webp&w=3840&q=75)